fbpx
Article

Truth From The Stand Podcast #2: Spring And Summer Deer Projects

Today on the show Phil and I talk spring and summer deer projects, game cameras, trimming shooting lanes, trespassers, and joining an archery club.

To listen to the podcast click the orange play button at the top of the page.  You can also download the podcast via iTunes, Stitcher Radio and Google Play—don’t forget to  share with your friends! If you like the podcast, we’d be incredibly appreciative if you left us a 5 star rating on iTunes.

Click here to listen/subscribe on iTunes (best for iOS devices)

Click here to listen/subscribe on Stitcher (best for Android devices)

Click here to listen/subscribe on Google Play Music (another option for Android devices)

What To Expect From Podcast #2 :

—What Clint and Phil have been up to the past few weeks

—Clint’s Memorial Day weekend at the farm

—Our anger for the Pittsburgh Pirates

—How to calmly handle trespassers…..

—Our spring and summer deer projects

—Joining an archery club

Show Notes And Links:

Clint’s daughter has her first hunt, read about it here

Learn how to extend your bow range here

And visit our podcast page to listen to our other podcasts

Don’t forget to drop us a question you’d like us to answer in the form below

[contact-form-7 404 "Not Found"]
Article

Tips To Extend Your Bow Range


If you’re like me, you’ve spent your spring and early summer managing your habitat and food plots in preparation of the upcoming hunting season. Now it’s time to get those game cameras out, if you took them down,  to watch velvet bucks develop into what you hope are the hit list bucks you’ve been waiting for. I know how time consuming managing your hunting property can be and we often do it at the expense of equally important tasks. Now’s the time to extend your bow range and make sure you’re in bow shape come opening day.

Commit

In an earlier bog post, I mentioned that spending time with your bow is a great item to add to your whitetail off-season to-do list. Well this is one instance when I’ve taken my own advice and joined an archery club. This off-season I purchased a completely new set up; new bow, new release, and new rest. Needless to say, I need as much bow time as I can get until this new one begins feeling like an extension of my body.

As if breaking in a new bow isn’t challenging enough, I also set a personal goal to extend my effective bow range out to 40 yards. Living in the suburbs and with our farm being a 3 hour drive away, my best option to get in plenty of range time to meet my goal was to join the Wapiti Archers of Pennsylvania archery club 10 minutes from my house. They have everything I need: a nice bag range out to 50 yards, and two 3D courses with shot distances out to 50 yards. Now just going to the range alone isn’t going to help me, or you, achieve our goals; a plan is necessary.

Know Your Limits

Before beginning to extending your effective bow range, it’s necessary to understand the baseline your attempting to increase or enhance. A great way to test your current effective range is to shoot two separate groups of six arrows. If both groups fit within the diameter of a softball, then you can consider that your effective at that range and are ready to increase your distance. It’s important to be honest in this step. If you find yourself saying “close enough” during this step, you’ll need more time dialing in at a comfortable distance before adding yardage.

Form

One thing you’ll need to determine quickly is if you’re consistently using proper form. Small  quirks are of little consequence at the range shooting at bags and 3D targets.  Those small quirks are a different animal when in the stand dealing with a full blown case of buck fever. Do yourself a favor and head to a pro shop near you. The guys and gals at the pro shop can help even the worst form offenders and can help put you on track to more accurate shooting at longer distances. While you’re there, have them check your draw length and make sure your bow fits as it should. One of the most common reasons for an archer’s lack of consistency is due to an overly long draw length.

Less Is More

Now that your dialed in at your current effective range and you’ve addressed any form/technical issues, begin adding yardage to your shot. “Less is more” is absolutely one of the worst cliches known to man, but in this instance, it is the best advice to follow. Ideally you’ll want to add yardage in 5 yard increment, spending approximately a week at each new distance until you reach your goal range. This of course is only a guide, as some may be able to make a 10 yard jump.  If you find yourself struggling at the new distance, or worse yet experiencing target panic, it may be time to head back to close range practice (around 10 feet shooting into a blank target) to regain your form and confidence. Even the best archers will use the blank target method to tighten up their form, mechanics, and shot sequence.

Challenge Yourself

Once you’ve extended to your goal range, why stop there? Continue to extend your range. You may not ever take a 70-80 yard shot while hunting in the whitetail woods, but shooting accurately at more extreme distances can make your 20-40 yard shots on stand easier (I hesitate to call any shot in the whitetail woods a gimme).

Tips To Extend Your Bow Range

Final Thoughts

Extending your effective bow range from 20 to 30 yards nearly doubles the area you can cover from the stand. Thirty yards is my current effective range. My groups at this range are consistent and I’ve harvested whitetail just beyond this distance in the past. Ideally, I’d like to extend my effective range to 40 yards. At my archery club, I’ll be able to shoot out to 50 yards and I’ll have the opportunity to stretch that distance out to 55 or 60 yards when I’m at the farm. The process of extending my effective bow range won’t happen overnight, but I know that it will be time well-spent come this fall.

Article

Spring Cleaning Your Deer Habitat

So spring is here…or came and went and moved right to summer temperatures. Anyway, spring  usually means the always exciting activity of spring cleaning is here too. The thought of cleaning places unseen or touched with a mop since last spring are, well, let’s just say there’s good reason spring cleaning only happens once a year. But I’m not talking about cleaning the gutters; I’m talking about the more important activities (to deer hunters) that are part of spring cleaning your deer habitat.

Whether you own, lease, or have access to private ground, spring is when you lay the groundwork for success in the fall. Even if you’ve not begun your spring updates yet, it’s not too late to get started. Here are a few things to consider as you approach spring cleaning your deer habitat.

Clearing Hunting Access Routes

Having adequate access routes to and from stand locations is often one of the most overlooked aspects of a hunting strategy. We’ve all been guilty of taking the easy route to a stand that leads to jumping deer. This is the time to make adjustments to reduce those unwanted encounters.

Our farm access routes are relatively well-defined, as many are old logging roads that take minimal effort to keep clear. With that said, not all our routes provide ideal entrance and exit options. A few of my stand locations need a dedicated access route to keep my scent and noise from intruding a nearby bedding area on my entrance and exit. You don’t need fancy equipment to clear trails or create better access. In my case, I used a machete to create a small (wide enough for me, my stand and my bow to fit) more direct trail to my stand location through some undergrowth. When clearing or creating new access routes, you should do so with 3 goals in mind; remain hidden, keep scent away from known bedding and deer travel routes, and travel perpendicular to known deer movement or trails. Of course, the use of an ATV or chainsaw when doing any outdoor work  is helpful, but this job can get done the old fashioned way, too. And there’s something therapeutic about swinging a machete wildly after a long week of work.

Preparing Food Plots

Planting food plots occurs predominantly between spring and late summer, depending on the type of forage you intend to plant. Make sure you follow the planting instructions as indicated. With that said, many of us likely have a mixture of warm and cool season forage and will need to begin to prepare seed beds for the warm season plantings in early spring. Unfortunately, I have yet to plant our soybean plot due to rain and lower than usual soil temperatures. I’ve spent more time in May staring at soil temperature maps than anyone should.

For warm season plots, early spring is the time to spray and kill all vegetation in preparation for establishing a new plot, or burning down an existing plot to start anew. If you’re working an existing perennial plot, spraying for both grasses and broadleaf weed control is a must.

Whether planting an annual or establishing a new perennial plot, you’ll need to decide how you intend to sow the seed. There are a few options and each has its pros and cons.  You can till up the ground, creating a nice seed bed to provide good seed to soil contact. This is the option with the most successful rate of seed germination, but is time consuming especially without the help of some type of modern equipment. Using a no-till method can be quicker and help to better control weeds since the soil is minimally disturbed. This allows dormant seeds lying in the soil to remain dormant, but may require specific equipment. The required equipment to no-till can be rented if not already owned.  I’ve recently been giving thought to trying the no-till top sow method. This will require only killing the plot and broadcasting seed onto the dead vegetation. The upside to this method is it requires less equipment and less time than preparing a seedbed or no-till planting, but it will require spreading seed at a higher rate, therefore increasing seed cost. You’ll also want to plant something with small seeds to insure they find their way through the dead debris to the soil. I’ll likely try this on one of my smaller, cool season forage plots before using it on my larger plots.

As always, make sure to perform a soil test annually and follow the guidelines the soil test provides. This should help in determining what crop may be right for your land and how much lime and fertilizer will be needed for any of the described planting methods.

Cutting And Thinning Timber

Cutting and thinning timber is a great way to increase your habitat however, it can be a dangerous endeavor for even those folks most experienced with a chainsaw. First and foremost, make sure you are using all the necessary safety equipment before firing up the chainsaw or hire a professional.

Before heading out to the timber to start cutting, be sure to have a plan in place. Cutting timber without a purpose will likely ruin more hunting and habitat than it will help. Contact a local forester (a forester with QDM experience is preferred) to get a sense of tree species on the land and how to approach cutting to achieve specific timber and habitat goals. Determine your habitat goals and be strategic about where cuts or thinning is performed. Do you want to create bedding, change the way deer move on your property, or open the forest canopy to allow sunlight to hit the forest floor, creating growth from a dormant seedbed? These are important question to answer before entering the woods with a chainsaw.

My suggestion is to start with small cuts or thinning projects. It’s much easier for habitat to recover from small mistakes versus swinging for the fences and negatively impacting your hunting and habitat with large scale timber cutting errors. Large timber cutting mistakes can impact a habitat for years.

This year, we took a modest approach with the chainsaw at the farm. Our goal was to create a small doe bedding area near a food source. The hope is the bedding on the point of the ridge, 500 yards further to the southwest, will then be used as a buck bedding area. In a separate area we fell all the dead trees, opening the canopy to promote undergrowth. So far we’re seeing early returns. On a recent scout, the bedding we made is being used as we hoped, and the undergrowth cut has created a nice crop of green briar.

Scouting

Spring is a great time to hit the timber for some scouting. With hunting season months away, the little bit of pressure placed on a property during spring scouting will be long forgotten by the deer herd come fall. Pairing scouting with spring turkey season is a great time to kill two birds with one stone. Or in my case, miss one bird and gather deer intel. Identify any new travel routes, bedding areas, scrape locations and rubs from last season. This information gathered in spring may not hold true into the fall, but will provide a great foundational understanding of any property you intend to hunt.

Scouting this spring has the potential to pay off in a big way for me this year. A 40 acre mountain on our farm goes virtually untouched every year. The wind on the mountain is fickle, it’s a bear to climb, and you won’t get run over with deer, which can make for some long hunts. I’ve known deer are living on the top of the mountain, and have trail camera images over the past two years that suggests a nice buck calls the mountain top home. This year, I’ve set out to successfully hunt the mountain, if for no other reason than it’s one of the only locations in our area with little to no pressure. This past month during a spring scout, I found a prototypical “big” buck bed. I’ve hung a few game cameras on a nearby trail, hoping as bucks come into velvet I’ll get the proof I’m looking for.

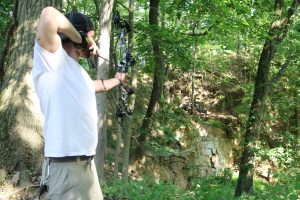
Hanging Stands & Trimming Lands

Once it’s time to start hanging stands and trimming shooting lanes, I can almost feel the cool, fall air and taste the bad hunting camp coffee. Okay, maybe that cool air is the current reality of my May weather. Regardless, late spring is an ideal time to hang a few stands and trim shooting lanes. Again, it’s a few months until deer season, so no need to be concerned with placing pressure on your property. Spring also provides the perfect opportunity to get an accurate view of what the timber will look like, and how shooting lanes will need to be trimmed for the upcoming early season. It’s easy to forget that the wide open shot you had mid-November will be impossible with all the foliage in early October.

To be honest, I only hang 2-3 stands at most as I use a climber for just about every hunt. I also do very little trimming as I prefer the cover versus wide-open shooting lanes. That being said, I will take my climber and climb a few select trees, trimming what’s within my reach to make my climbs a little easier in the fall.

Final Thoughts

Let’s face it, for deer addicts our to-do list is never ending. Deer hunting is a year round obsession. So who cares what time of year it is. Get into the outdoors and play in the dirt. If nothing else, spring cleaning your deer habitat will keep you away from whatever the scary things that have taken up residence in your gutters.

Article

Working Out The Kinks: Tree Stand Practice

With the beginning of the whitetail archery season closing in, most of the larger projects and preparations should be in place. Late winter is usually the time when archery hunters’ efforts are focused on shed hunting, and monitoring trail cams to see which of the “hit list” bucks have made it through the hunting season and the long winter. Attention will quickly turn to food plot preparation, property management and herd evaluation throughout the spring and summer. Off season efforts are time consuming, and in many cases, labor intensive endeavors. It’s easy to overlook the finer points of the hunt, and one of the most crucial components that will determine success or failure during the season—shooting accuracy and confidence

 I typically make it a priority to visit the range during the offseason. And when the weather permits, I head outdoors to shoot as often as I can, but never as often as I’d like. This regimen usually consists of flatland target shooting, which allows me to keep the rust to a minimum.

 That being said, my first set at the beginning of every season, typically involves a little apprehension and anxiety. The unfamiliar feeling of being 20 feet plus above the ground takes a moment to adjust to. I’ve also added a few new elements to my hunting experience this season that calls for extra practice and preparation. I’ll be using a Lone Wolf climber tree stand for the first time, and this will be the first season I’ll be filming my hunts. With introducing these new elements, I decided to begin working out the kinks of my set up and stand game this past weekend.

 The goal was to build confidence and accuracy by creating a scenario similar to an evening hunt. By acclimating to being off the ground, getting my camera gear in place, and ultimately shooting from the stand while wearing my safety gear, I’m building upon the work I’ve done at the range and outdoor target shooting. I’ve done a few climbs with the stand in the offseason, so the ascent was smooth to twenty feet.  Getting the camera gear in place was a different experience (one HD camcorder and one action cam), but all-in-all, wasn’t as challenging as I had thought. The practice shots…? I’m glad I took the practice run.

 Prior to climbing, I released a few arrows from flat ground to make sure my bow was accurate. My grouping at 40 yards was approximately the size of a baseball, which I felt was a good starting point. From the stand, the first shot was centered, but high. Next shot—high again. Next shot—still high. After 7 arrows I finally settled into a softball-size grouping at 30 yards. The feeling of shooting from the stand quickly came back, but had those first few shots been at the 11 point I have on camera, I’d have been more than a little upset.

There’s no replacement for practice from a tree stand. And I feel that we as hunters owe it to the animals we hunt to be accurate, and to have done everything in our power to be prepared to make an ethical kill when the opportunity presents. Whether it’s to calm the uneasy feeling of being off the ground, or to hone mechanics in the stand, stand practice is time well spent. So grab a friend (helps with arrow retrieval, and will usually perform the task for a cold beer), a stand, your bow, and put in some preseason stand time. Practice how you plan to perform, when you encounter your moment of truth from the stand.