fbpx
Article

Best Hunting Bow Review | 2021

In today’s video I’m shooting, reviewing and comparing a flagship bow from Prime, Bowtech, Elite, and Mathews. By the end I’ll let you know which bow I’d purchase…or if I’d keep my current bow. I’m not sponsored by any bow manufacturers and am a normal guy evaluating these bows based on what I prefer for hunting purposes only. Hope you all dig it!

Article

Turning A Prusik Knot Into An Ascender For 10 Cents

Using a Ropeman 1 or Kong Duck can make using a lineman’s rope much easier and convenient. Especially when climbing in and out of your hunting saddle or mobile stand in the dark. But is that convenience worth $40 to $60 dollars, the cost of an ascender? What if you could get the convenient use of an ascender using the prusik knot that came with your lineman’s rope by adding 10 cents worth of 550 paracord? That’s what I’ll show you in this video. We’re going to turn your prusik knot into a fancy ascender for 10 cents.

Article

How To Hang Your Hunting Gear | Public Land Legal

Staying organised in the tree is critical to minimize movement and stay streamlined and keep a low profile. Not to mention that a lot of states won’t allow you to screw hooks/hangers into trees to hang your hunting gear. In today’s video I’ll show you how I stay public land legal in all 50 states and am still able to hang and organise all my gear without using hooks. This approach will work for both saddle hunters and treestand hunters.

Article

How To Make A DIY Public Land Legal Bow Hanger

I’m always trying to make my gear lighter with less fiddle factor, and create less work to hang gear when I’m getting set up. I’ve used Hero Clips in the past to hang my bow in the tree while hunting but have dropped them, or lost them when I pulled ropes or other gear from my saddle pouches. I got the idea to use kydex to make a bow hanger that is lightweight and mounted to my bow from my buddy ( @G2 Outdoors  ) and wanted to give it a go. A DIY bow hanger that is public land legal in all 50 states!

Article

The Perfect Hunting Trailer

Come along for a tour of my completed/converted DIY hunting trailer! This past fall I lived in this converted cargo trailer for two weeks hunting across the midwest. During this time I learned what items I can’t live without and what items I can do without to save space or headache.

Article

Mobile Hunting Gear

Today I’m going over all the gear I use from early season, to the rut, and through late season…saddle, sticks, bow, boots, and camo…you name it, I’m covering it. Whether I’m hunting at home or traveling out of state…this is the gear I rely on to keep me mobile and in the game!

Article

Freelance Deer Hunting Strategy | Iowa Public Land (Video)

Rather than share theories of how freelance hunting can work for you on travel hunts or on local lands you have limited information about…I thought I’d give you a real life example – the proof is always in the pudding (who knows what that means…I don’t think I’d eat that pudding??) Anyway. 

In this final episode of the three-part DIY Hunting Strategy series I’ll share with you on the map how I used freelance hunting to fill my tag in Iowa, and walk you through my thought process and decision making during the hunt. The parcel I was hunting is a little more than 9,000 acres. I did do a two-day scout in March prior to the season. But abandoned the areas I had scouted for a piece of public I had never walked on until I hunted it for the first time.  

There were ups and downs…but ultimately my persistence paid off!

Clink play button to watch video

Ps. If you’ve not watched part 1 “Planning an Out-of-State DIY Public Land Hunt”  or part 2 ” Deer Hunting Strategy | Freelance Hunting” you may want to check those out too!

Article

DIY Public Land Hunting Strategy | Freelance Hunting

If you’re tired of hunting the same properties, the same old set ups year-after-year, with the same results, and want to make the switch to mobile hunting – then this video is for you. We often get locked into areas due to familiarity or past success (past success can be one of our biggest drawbacks). And if those areas are cold during the season…or you missed the action by a day or two, your season ends up just as cold as your trusty set ups. Like most things in life, ones willingness and ability to adapt is often a strong indicator of success. This realization in the deer woods a few years ago has pad off – particularly on out-of-state public land hunts. 

In this video I share the strategies/approaches I’ve learned and executed the past few years to remove the guess work from freelance hunting and put myself in position for success.  There is a learning curve…but once adopted your confidence will go through the roof and you’ll be hunting the right spot at the right time a lot more frequently.

Clink play button to watch video

It can be intimidating to walk into a piece of timber with nothing more than map intel. But it’s probably one of the more freeing feelings I’ve had hunting, and is the primary reason my out of state tags have been filled along with my good buck encounters improving dramatically. 

Ps. If you’ve not watched part 1 “Planning an Out-of-State DIY Public Land Hunt” you may want to check that one out too!

Article

How To Plan A DIY Out-of-State Public Land Deer Hunt

The big misconception is that traveling to hunt has to be expensive or difficult. I’ve managed to fill buck tags in a few states and developed a process for how I plan and scout/hunt that’s helped me find success. This video is the first of a three-part series where I outline my process. My hope is the video series helps those of you thinking of taking a trip, to take the plunge. And for those of you who are already traveling, maybe you can pick up something that helps make your planning easier or helps you fill more tags!

In this video I outline my tips and process for planning an out-of-state public land deer hunt. I’ve included links to gear and resources that may be helpful in the video description

Article

Filling Tags Using Historical Trail Camera Pictures

The whitetail off-season is in full swing and by now many of us have been out shed hunting, scouting, and beginning to plan for next season’s hunts. Although spring is here, we’ve recently endured our fourth Nor’easter here in Pennsylvania, which brought many of my off-season activities to a halt. As a result, much of my scouting has been moved indoors as I use e-scouting to view new properties and revisit trail camera pictures from past seasons.

I’m a firm believer that past behavior is a strong indicator of future behavior. Said more plainly, if a person is a subpar employee today, chances are they’ll be a subpar employee in the future. Applying that philosophy, it stands to reason that a buck’s past behavior would indicate his future behavior, too. This is exactly why I often review the previous year’s trail camera inventory to formulate this year’s plan when I’m patterning a specific buck. The current images are used to confirm the buck I’m patterning is using his same core areas throughout the hunting season, and to target any new bucks for the following year. The more historical data you have on a buck, the better your odds will be of harvesting him. You’ll usually get only one opportunity to do so, therefore the more you know about him the better.  Here’s how I approach building a plan based on previous years’ trail camera pictures.

Inventory Cameras

Many hunters run inventory cameras during spring and summer to get a sense of the deer herd and the buck inventory on a property they plan to hunt. I do the same. However, I keep a handful of Exodus trail cameras out all year round to monitor food sources, so I know which bucks have made it through hunting season and which will be potential targets for the following year. For monitoring purposes, I’d recommend leaving cameras out at least until antlers drop in late winter/early spring.

Building Data & Aging

After I have an idea of which bucks have made it through the season, I’ll file away the images of those I consider potential targets for the next year.  I’ll then compare the most recent buck images to images of bucks from years past to see if there is any recorded history. The goal is to try to identify these new target bucks with unique antler or body features (bend in a brow tine, a unique marking, etc). My goal is to not only identify and aggregate my data for a particular buck, but also accurately age the buck so I know if it’s a buck that should be hunted the following year. In Pennsylvania, I typically target 3-year-olds on family farms, as this age would be considered a mature deer in the areas I hunt. If all of this sounds a little overwhelming, know that there are cloud-based software tools that you can use to assist in organizing your data and trail camera images. I’ve used DeerLab in the past and it has worked well.

Laying The Groundwork

Now that I’ve identified a target buck and analyzed the top level trail camera data, I begin to look at the trail camera pictures with a more critical eye. I search for clues related to travel direction, wind direction, day or nighttime movement, and how his core areas shift as hunting season progresses. Often these clues are cause for more investigating, but that’s to be expected. As I collect and analyze this data though, I think about the still lingering questions in relationship to the property I hunt and how the information weaves a story. For example, if a buck is consistently traveling from the north an hour or two before dark toward a food source, chances are his daytime bedding is north of the camera location. Less eloquently stated, his bedding is likely in the direction his ass in pointed in the trail camera picture. This then leads me to search my OnXhunt app for topography and overhead imagery that would narrow down areas that look like good travel corridors in relationship to where he’s bedding and where he’s feeding. At this point, I have the information I need to make a move. I’ll choose a day with good weather and an “almost right” wind for him to use a particular travel corridor, and hope my planning pays off.

Putting it All Together

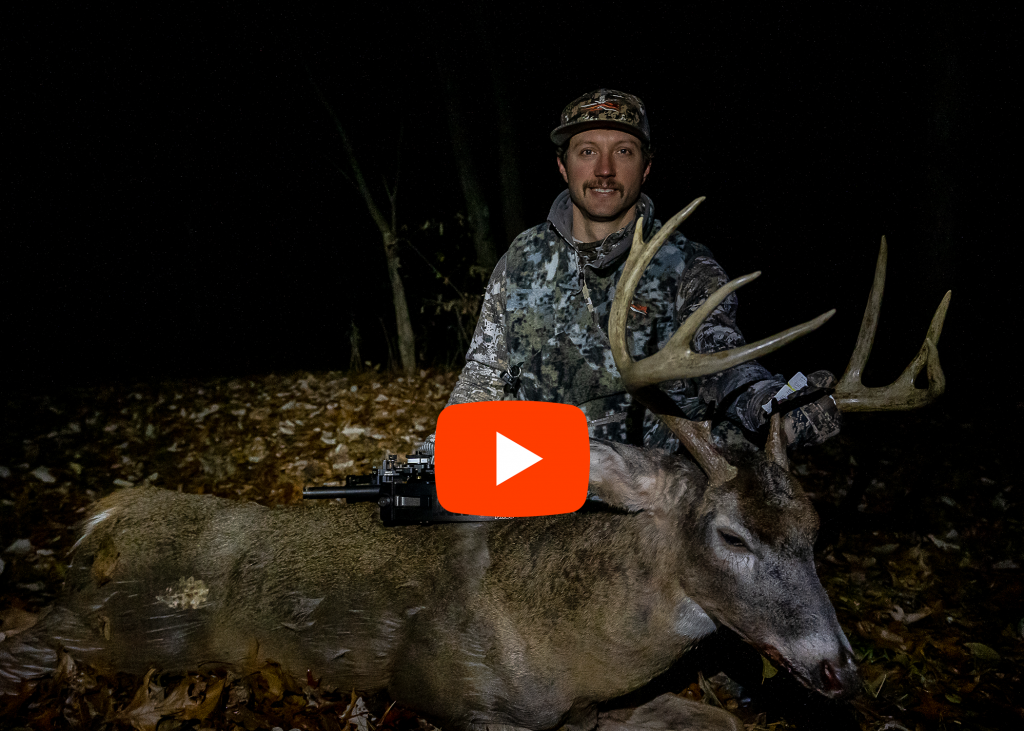
This year I worked this plan to near perfection. I had watched a deer for two years as he aged and reached the prime age of 4. Through the previous two years of trail camera images and three live sightings, I had aged this buck, identified his unique body and antler characteristics, narrowed down his daylight movement to only evening, and determined where he was bedding.  Using Exodus trail cameras on video mode, I identified his consistent travel direction and corridor, and ultimately, the particular pinch point where he’d be killable. I had an encounter on opening day with this buck at 30 yards, only to be blown by the younger sidekick he was traveling with that day. He avoided my arrow yet again however, he fell to my buddy’s bullet during rifle season. UtIlizing the previous year’s trail camera data has changed the way I hunt. Even if I don’t fill my tag, I know I’ve put myself in a better position to season my tag soup with some great encounters.